| Back to Back Issues Page |
 |
|
VIVA ZIVA ! newsletter: Volume # 1823: FREE DECORATIVE MOTIFS FOR CHILD’S CHRISTMAS STOCKING September 25, 2018 |
V I V A Z I V A ! n e w s l e t t e r ▪volume number: 1823▪ FREE DECORATIVE MOTIFS FOR A CHILD’S FIRST CHRISTMAS STOCKING ▪
GET READY FOR CHRISTMAS! STITCH DECORATIVE MOTIFS FOR A CHILD’S FIRST CHRISTMAS STOCKING! Thanks so much for subscribing to the VIVA ZIVA! Newsletter. We’ll be issuing a newsletter regularly, with a new free design each time... exclusively created for the VIVA ZIVA! newsletter. WE’RE STILL BUSY AS EVER CREATING NEW DESIGNS AND PAINTING CANVASES! We thought you would like to see some of our RECENT PAINTINGS . PLUS…… NEW DESIGNS RELEASED for ART NOUVEAU CARPETS AND ANOTHER STAINED- GLASS CUSHION to add to ZIVA’s popular Stained Class Cushion Collection.
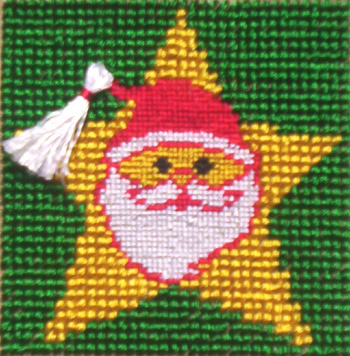
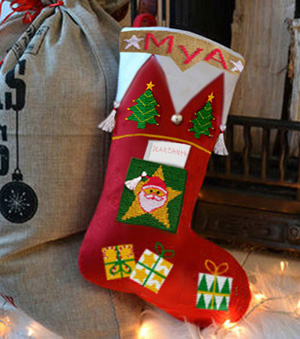
A ‘NOTE TO SANTA’ POCKET FOR A CHILD’S FIRST CHRISTMAS STOCKING! This motif above, “A Note to Santa”, and other Christmas-themed motifs (gifts and Christmas trees) have been created to attach to an existing Christmas Stocking…. or one you can make up! No time before Christmas to make the whole stocking? We also suggest other uses for the decorative motifs …..for a very special Christmas! We are also featuring the Penelope canvas to get the details on Santa Claus’ face just right for our "A NOTE TO SANTA" pocket design. The Christmas stocking motifs were fun to design and stitch,
…. guaranteed to bring joy to a child’s first Christmas! Click here to see our newsletter back issues.
WHAT’S IN EACH VIVA ZIVA! NEWSLETTER?
NEW DESIGNS & UPDATES NEW ART NOUVEAU CARPET DESIGNS ARE HERE!
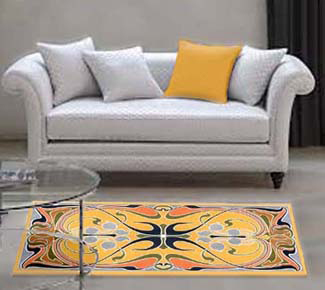
The ‘Clematis Buds’ carpet design (above) is just one of three new Art Nouveau carpet designs NOW AVAILABLE! Go to Art Nouveau Area Rugs and have a look! The ‘Clematis Buds’ motif has all the design elements of classic Art Nouveau present in its elegant design… fluid floral theme, natural sinuous contours, whiplash curves, and shapes inspired by nature. I love how well it complements this modern sofa with its lovely elegant curved arms. All designs would also work well adapted for seat benches, piano benches or wall tapestries Custom sizes are always available, just contact us! ZIVA PRESENTS NEW STAINED GLASS CUSHION DESIGNS!
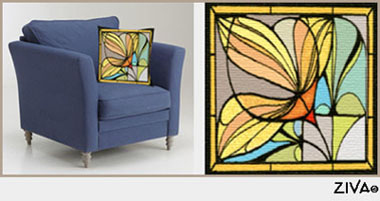
We’ve adapted this Art Nouveau motif to create an elegant, lyrical stained-glass cushion design, called ‘Saffron Day Lily’. Have a look at how we re-worked this design for an exquisite Art Nouveau area rug, called 'Day Lilies'! A stained glass collection wouldn’t be complete without a few Henri Matisse’s iconic designs!
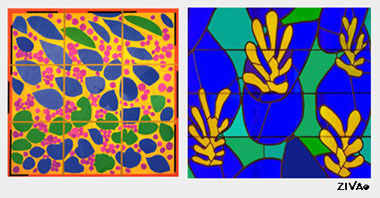
We adapted two of Matisse’s stained glass patterns, called ‘IVY IN FLOWER’ and ‘VENCE’ to add striking bold colours to to-day’s neutral contemporary interiors. Learn more background about them! RECENT PAINTINGS A contrasting mix of recent paintings ! First……
This Tabriz seat bench is a perfect example of how we customize our designs! We took our Tabriz piano bench and reworked the intricate individual sections of borders and central motifs to create a seat bench almost 10 foot (3 metres) long! For ease of hand-painting and stitching, we divided it into three sections, with a plain border separating each section. The lower image shows the detailed hand-painted central panel ready to ship out! AND THEN WE PAINTED TWO DIFFERENT CANVASES!
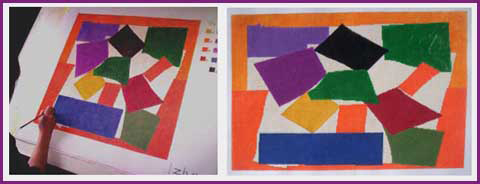
We took our standard Matisse’s Snail design (above left), at 24” square, and reworked the proportions to suit our client’s requirements to create a very different CUSTOM DESIGN at 12” x 18” (painted above right).
Happily, it still looks fantastic! YOUR STITCH/TECHNIQUE TO TRY THE PENELOPE CANVAS
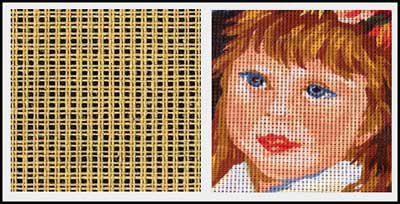
We used the very traditional 19th century method of using the Double Thread or Penelope canvas, which is ideal for adding a lot of detail in certain areas (at 20 holes per inch) and a larger stitch for other areas (at 10 holes per inch). This image of a printed Penelope canvas of a child’s face (above right) shows how the subtle nuances in her skin colour are possible. 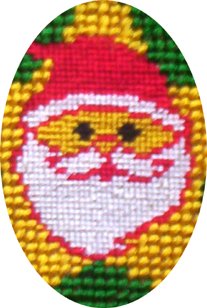
For the Santa Claus motif and other patterns where you want detail in specific areas only, stitch over single threads using the Tent stitch with a fine needle (#24). The rest of the motif, e.g. the star and background, stitch over pairs of threads, with a larger needle (#16). You can see the contrast between the two stitches in this close-up of SANTA’S face, hat and beard!
PRACTICE THIS NEW STITCH FIRST! Keep practicing on a piece of Penelope canvas until you feel you are ready to stitch the free design.
FREE DESIGN
THE DESIGN We wanted to create a very tactile design in classic Christmas colours of Red, Silver, Gold and Green to appeal to a child’s senses! First we designed a small pocket for your child to put in a note for Santa Claus….. the star of the show with his tasseled hat!
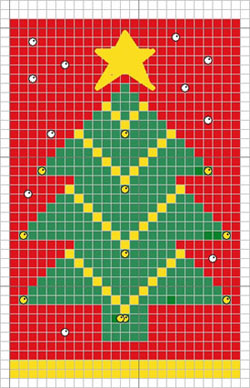
Together with the stitched textures of our other free motifs of gifts, and Christmas trees, we are suggesting adding tassels or pom-poms, beads, ribbons and a Christmas bell! Also, to add to the effect, we left the canvas exposed in some of the backgrounds of the motifs and painted them red, silver and gold! All these free decorations are attached to an existing purchased stocking or ……one made up using white felt for the cuff and red felt for the rest of the Christmas stocking.
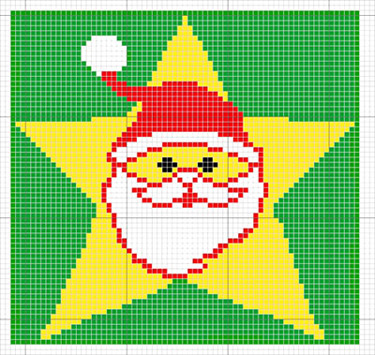
READING THE CHART: A NOTE TO SANTA CHART POCKET CHART
STITCHING TIPS
FINISHING IDEAS
CHRISTMAS TREES CHART
STITCHING TIPS
FINISHING IDEAS
GIFTS CHARTS
STITCHING TIPS
FINISHING IDEAS
CHILD’S NAME ON CUFF STITCHING TIPS
FINISHING IDEAS
YARN COLOURS All the yarns for the motifs for the child’s first Christmas stocking were chosen from DMC SATIN threads range of colours. They are readily available at your local needlepoint shop or online.
QUANTITIES As a guide, you will require approximately two skeins of all the colours, andoneskein of the black, for the ‘A Note to Santa’ pocket. Depending on what other motifs you decide to stitch, select two more skeins at least for each colour. No more black thread is required.
OTHER MATERIALS You will also need :
Go to the ZIVA site for more detail info on the MATERIALS required.
MAKING UP SUGGESTIONS
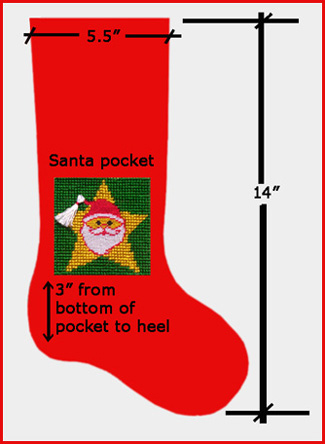
In a rush at Christmas? Then purchase a ready-made red Christmas stocking (with a white cuff) in a similar size (if possible) to the one shown. More Time? If you have time, you’re a sewer and prefer to make your own, you will need red felt cut in the size and shape shown and white felt at 3-4” high (approx. 7 – 10 cm) x 11.5” (28.75 cm) long. Add 5/8-inch seam allowances to these measurements. You will also require lining for the inside of the stocking. Hand sew the various motifs to the stocking in the positions you want! I HOPE YOUR SPECIAL CHILD LOVES THE CHRISTMAS STOCKING! HAPPY HOLIDAYS!
ASK THE ZIVA DIVA! QUESTION: Hi Ziva, I’m interested in Pines and Needles cushion. Are most items in stock and ready for shipping? Thanks, Celia, England
ANSWER: Hi Celia, We have approximately 150 designs on our website. We can't possibly stock that number of hand-painted canvases, considering a great many of our orders are custom to suit a certain client’s requirements. For example, the Pines and Needles motif that you are interested in is available as a cushion as you know, but it also has been adapted to suit the dimensions of a client's footstool. Likewise, we have adapted some of our standard designs to fit window seat benches, piano benches, dining chairs, etc. NOTE: Also included in this newsletter, (above under Recent Paintings), we have shown the standard Matisse’s Snail cushion at 24” square, and the custom size at 12” x 18” we were asked to create. Hoping you’ll let us create something for you in the future! Regards, Sylvia McLeod
WHAT NEXT?
The next VIVA ZIVA! Newsletter #1924 will be issued in the spring of 2019 . I’ll be including:
Please contact me if there is a particular stitch you’d like me to use for a free design in a future newsletter!
Share this newsletter with friends and relatives. Looking forward to sending you the next newsletter! Sylvia McLeod
|
| Back to Back Issues Page |
