
|
V I V A Z I V A ! n e w s l e t t e r ▪volume number: 0901▪ F R E E Bracelet Design ▪
Thanks so much for subscribing to the VIVA ZIVA! Newsletter. I’ll be issuing a newsletter every three months, with a new free design each time... exclusively created for the newsletter.
WHAT’S IN EACH VIVA ZIVA! NEWSLETTER?
NEW DESIGNS & UPDATES
A NEW HANDBAG IS IN THE WORKS!
I’ve just finished stitching a New Handbag creation called ‘Dutch Iris’.
I combined contemporary colours of tan, taupe and black to the classic Art Nouveau colours of turquoise, mauve and peach tones. What a great combination!
The youthful-rounded shape of the hobo bag works well with the delicate curves of the stylized Dutch Irises.

Stitching in progress:

Blocking Stage:
The Next Step?
Now all I have to do is stitch the full width pocket for the back of the handbag. I’m really looking forward to making it up...it’s a stunner!
Then it’ll be ready to show it to you finished on the Handbags and Purses page of the ZIVA Needlepoint Designs site!
YOUR STITCH TO TRY
Your first stitch to try has to be the Basketweave Stitch. It’s very important to master this basic needlepoint stitch! That’s why I created the Anatolie bracelet design exclusively for my first newsletter.
All the angles are on 45° to help you see how the basketweave stitch works. It’s the perfect design, with squares and triangles, to get you started.
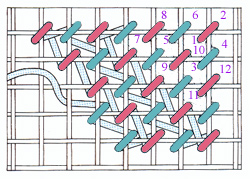
The diagram at right shows the basketweave stitch on a woven evenweave canvas. Starting at # 1, work the red stitches on the diagonal down on the vertical row of threads. The turquoise represents the stitches that you work up on the horizontal intersections. Always work from the top right diagonally to bottom left.
Tips for Stitching Basketweave Tent Stitch
FREE DESIGN ANATOLIE BRACELET DESIGN
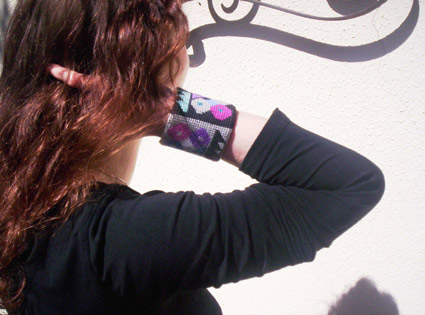
This bracelet design was inspired by a 19th century design from a border of a prayer rug from Anatolie (now Turkey). It’s made up of graphic bouquets of carnations simplified to elemental geometry in cool colours of turquoise, purple, fuchsia, blue, grey and black.
COLOURED CHARTS
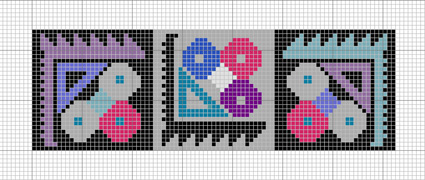
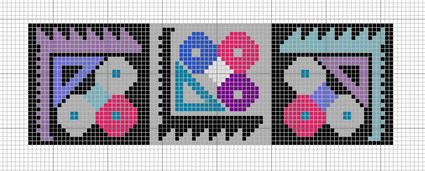
I’m including two coloured charts for your reference at different gauges, so you’ll have no trouble getting the canvas in your area.
This first chart above is for canvas at 12 holes per inch
This second one above is for canvas at 13 holes per inch.
YARN COLOURS
All the yarn colours are from the DMC Soft Cotton Colour Range, which are readily available at your local needlepoint shop or online. You will need two skeins each for the background colours and one skein each for the rest of the colours.
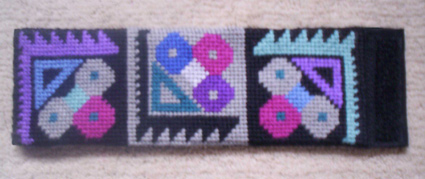
Colours as stitched:
You will also need :
Go to the ZIVA site for more detail info on the materials required.


FINISHING 
SEWING TIPS:

Go to the ZIVA website for more tips on sewing needlepoint
ALTERNATE COLOUR SCHEME

If you like a range of warmer Contact me and I’ll give you the range of colours from DMC that will give a totally different look!
GREAT TIP! Repeat the square pattern and make up a belt ! You can vary the colours from one square to the other…even add a border of one of the accent colours if you want the belt to be wider. You can fasten the belt with Velcro as described above or add some fabric to the ends to tie it lower on your hips. Use your imagination and make it your own creation! Send me a photo of what you’ve done. I’d love to see it and put it on the site!
ASK THE ZIVA DIVA !
That’s me!
I’ve just received this excellent question:
This question came from someone who has had a frustrating experience when stitching a hand painted canvas.
The canvas she received was painted by an artist who did not understand how the stitches can affect the shapes and pattern of the design.
The artist also didn’t take into account the limitations of thread colour selections available to achieve shading.

So to answer the question, I’m a canvas painter and a designer. When I paint a needlepoint canvas, All the colours in my designs are selected from actual yarn colours. A close-up photo at right of the WHAT NEXT?
Lots of exciting things coming up!
All the ZIVA Needlepoint Designs you see on the Web site will be available to order in May 2009!
The next VIVA ZIVA! Newsletter #0902 will be issued in July 2009 . I’ll be including:
Please contact me if there is a particular stitch you’d like me to use for a free design in a future newsletter!
Share this newsletter with friends and relatives. Looking forward to sending you the next newsletter! Best wishes, Sylvia McLeod
|
